Friday, May 3, 2019

Steps to Disable Default cPanel Login Details For FTP Access

1.    Open up the FTP update file and edit it using the following command:
root@server [] vi /usr/local/cpanel/bin/ftpupdate
2. Move to the line number 189 or 211 and comment those. If you are using some of the old cPanel version, then you should get the following necessary code at line number 189 and if your cPanel version is the upgraded version then you can get
You can see the following contents after editing the above file:
$entry->[3], $entry->[6], $entry->[7], $entry->[8] ) . "\n";
$vhosts->{$system_user} = join( ':', $system_user, $entry->[1], $entry->[2], $entry->[3], $entry->[6], $entry->[7], $entry->[8] ) . "\n";

  1. After the changes are done, make sure you run following command:

root@server [] /usr/local/cpanel/bin/ftpupdate

You will be  secured from the hack attempts

Steps to resolve "Webmail Shows Internal Server Error: User is Over Quota."

Please refer the following steps:

  1. root@server[#] cd /var/cpanel/overquota
  2. root@server [/var/cpanel/overquota]# mv username username-bak

Make sure you replace the username with the actual cPanel username.

You won't see any error message after performing above steps.

How to Backup Data using Backup Manager in Plesk 12 (Windows)

    1.  Login to the Plesk control panel.

  1. On the left-hand side menu bar, under Server Management select Tools & Settings.
  2. On the next page, select Backup Manager from the Tools & Resources section.
4. On the Backup Manager Page, select where you would like to store your backup by selecting the relevant tab. Server Repository - This will back up to the server that Plesk is currently running on.Personal FTP Repository - This option will store the backup to any FTP space you have the credentials for. In this example, we are going to select Server Repository to backup the data
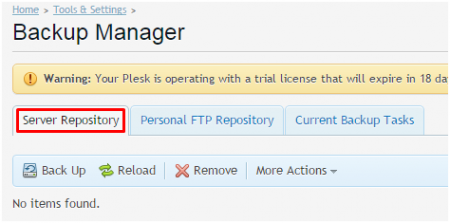
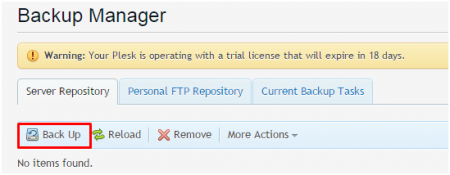
5. Now on the same page as Backup Manager click on the Backup icon.

6. Add a name for the backup that you can easily remember in the Add prefix to backup name box.  Add notes in the comments box as per your requirements.

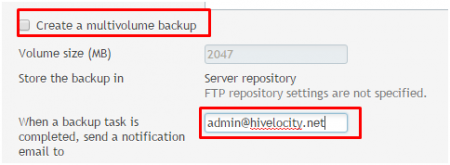
7. For the next step, scroll down a bit and enter the following information: Create multivolume backup - Unchecked. Store backup in - Unless you have a personal FTP repository set up, select Server repository.Email Notifications - Enter your e-mail address.

Thursday, May 2, 2019

Matchless 24×7 Server Management Services only at HostechSupport!!

Yes, Our Clients enjoy "Sound Sleep" because they have Trust in our 24x7 Tech Support!!!

HostechSupport provides Quality Technical Support for Hosting companies and ISPs around the world. At HostechSupport, your customers get 24x7 Support from staff comprised of a qualified and experienced team. You save money, time and a lot of effort which can be profitably utilized to market your core services. HostechSupport is a software development company founded and managed by very focused and globally experienced IT professionals having very strong and unmatched business process experience and expertise in the Web Hosting Solutions, Search Engine Optimization, Application Development, and Flash Development, etc. Our expanding technical resource pool enables us to effortlessly deploy requisite professional skills for client projects. Developing web presence, scaled up to complete online businesses is among the fortes of HostechSupport. Under our umbrella of customer services comes: 1. Cloud Set-up & Server Management 2. VPS Server Management 3. Server Administration 4. Server Management 5. Server Migration 6. Server Monitoring 7. Dedicated Support 8. Semi-dedicated Support 9. Email Support 10. Online Messenger Support 11. Helpdesk & Live Chat Support 12. 24x7x365 days Remote Technical Support For more inquiries, connect us at our 24x7 Live-Chat: https://hostechsupport.com Skype: hostechsupportindia


Saturday, March 9, 2019

How to Use of Cloudflare to help protect websites from DDoS attacks?

Cloudflare Performance Services boost up the conversion rate, reduces churn, and increases the visitor experiences by stimulating the web and mobile performances while keeping applications available. Cloudflare is DNS CDN provider.

If your website is experiencing a DDoS attack, then Cloud flare could help you to hide your original IP. Cloudflare may help to reduce, if you’re your website is facing DDoS attack. But if the attack is harmful it may not be able to handle. 

Cloudflare is created to secure your website from various types of malware  activities such as:
•Web software vulnerabilities
•SQL injections
•Spam comments
•Cross-site attacks
•Bruteforcing

You can secure your website from severe DDoS attacks using below steps: 
1.Enable it from your cPanel -> Cloudflare tool
2. Click Manage next to the entry for your domain name.
3.Select the Settings tab 
4. In the end, you have to change the value of Cloudflare Security Settings option to I'm Under Attack.

Now, when you enable I'm under Attack, your website visitors will see a processing page for a few seconds. The Cloudflare will verify and confirm whether the hit is coming from an authorized visitor and not from a bot. After the Cloudflare is enabled, the website may go to a redirect loop.
This may happen if you are using SSL on your website.

To resolve this issue, you must change SSL support for your website from 'Flexible' to 'Full Strict'. Generally, Cloudflare gets secure requests for your website & they will use another secure request over HTTPS to fetch it from its host server.

You can further change the SSL Support settings from your cPanel -> Cloudflare -> Settings tab. Once you change the value, you need to allow a few minutes.
Following the above steps, your website is now secured from harmful and vulnerable DDoS attacks.