Friday, May 3, 2019

Steps to Disable Default cPanel Login Details For FTP Access

1.    Open up the FTP update file and edit it using the following command:
root@server [] vi /usr/local/cpanel/bin/ftpupdate
2. Move to the line number 189 or 211 and comment those. If you are using some of the old cPanel version, then you should get the following necessary code at line number 189 and if your cPanel version is the upgraded version then you can get
You can see the following contents after editing the above file:
$entry->[3], $entry->[6], $entry->[7], $entry->[8] ) . "\n";
$vhosts->{$system_user} = join( ':', $system_user, $entry->[1], $entry->[2], $entry->[3], $entry->[6], $entry->[7], $entry->[8] ) . "\n";

  1. After the changes are done, make sure you run following command:

root@server [] /usr/local/cpanel/bin/ftpupdate

You will be  secured from the hack attempts

Steps to resolve "Webmail Shows Internal Server Error: User is Over Quota."

Please refer the following steps:

  1. root@server[#] cd /var/cpanel/overquota
  2. root@server [/var/cpanel/overquota]# mv username username-bak

Make sure you replace the username with the actual cPanel username.

You won't see any error message after performing above steps.

How to install LAMP on Ubuntu16.04

  1. Update your system (Login with SSH on your server)

Before we start, let’s make sure your system is up-to-date by running the following command:


#apt-get update && apt-get upgrade


Always keep your system updated. You can also set up automatic updates.

  1. Installing Apache

We will start with installing the Apache web server. Apache is considered as the most widely used web server software. It is fast, secure, reliable and can be easily customized depending on your needs.

To install Apache on your server, run the following command:


#apt-get install apache2


After the installation is complete, you should enable Apache to start automatically upon system boot. You can do that with the following command:

#systemctl enable apache2

To verify that Apache is running, open your web browser and enter your server IP address, (e.g. http://111.222.333.444). If Apache is successfully installed you should see a message saying “It works!”.

  1. Installing MySQL

Next, we will install MySQL on your server. MySQL is one of the most popular database management systems.

To install MySQL on your system, type the following command and enter Y to continue:


#apt-get install mysql-server


During the installation, you will be asked to enter a password for the MySQL root user. Make sure you enter a strong password.

After the installation is complete, in order to improve the security of your MySQL server, we recommend doing the MySQL secure installation by typing the following command:


#mysql_secure_installation


First, you will be asked about setting up the validate password plugin.

Would you like to setup VALIDATE PASSWORD plugin?(Press y|Y for Yes, any other key for No) :

This plugin checks the strength of a password and allows the users to set only passwords which are secure enough.

Whether to enable this or not is entirely up to you, but it’s always recommended to use strong passwords.

If you choose ‘yes’, you will be asked to choose the level of the password validation policy:

There are three levels of password validation policy:

LOW Length >= 8
MEDIUM Length >= 8, numeric, mixed case, and special characters
STRONG Length >= 8, numeric, mixed case, special characters and dictionary file

Please enter 0 = LOW, 1 = MEDIUM and 2 = STRONG:

Next, you will be asked to change the root password, but since we already created it during the MySQL installation, we can skip this step by pressing Enter.

After this, you will get asked a couple of more questions and it is recommended that you answer ‘yes’ to all of them:

Remove anonymous users? (Press y|Y for Yes, any other key for No) :

Disallow root login remotely? (Press y|Y for Yes, any other key for No) :

Remove test database and access to it? (Press y|Y for Yes, any other key for No) :

Reload privilege tables now? (Press y|Y for Yes, any other key for No) :

Again, we can enable MySQL to start on boot with the following command:


#systemctl enable mysql

With this, your MySQL installation is now complete.

  1. Installing PHP

The last step in this tutorial is to install PHP. PHP is a programming language mostly used for developing dynamic websites.

We will also include some additional modules, in order to help PHP to connect to our Apache and MySQL.

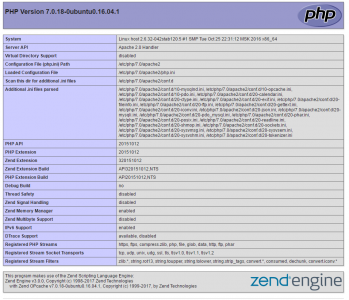
Now, if you navigate to this page: http://your_server_ip_address/info.php in your web browser, you will see the following page showing your current PHP configuration:


How to Restart Server services in WHM

1. Login to WHM
2. At your left-hand side menu, Search for Restart Services
3. From the Restart Services menu, select the administration you wish to restart.
4. Affirm you might want to restart this administration by clicking Yes

How to change SMTP server IP (Exim IP) on WHM server

Login to WHM

  • Click Exim Configuration Editor
  • Check the box next to:
  • "Send outgoing mail from the ip that matches the domain name in /etc/mailips (*: IP can be added to the file to change the main outgoing interface)"
  • Save Changes
  • Then edit the file /etc/mailips
  • from shell and add: *: #ReplacewithnewIP#
  • service exim restart

Login to Shell

  • Access the Exim configuration file:
nano /etc/exim.conf
  • Locate remote_smtp
  • The default setup will look like:
remote_smtp:
driver = smtp
interface = ${if exists {/etc/mailips}{${lookup{$sender_address_domain}lsearch{/etc/mailips}{$value}{}}}{}}
helo_data = ${if exists {/etc/mailhelo}{${lookup{$sender_address_domain}lsearch{/etc/mailhelo}{$value}{$primary_hostname}}}{$primary_ho stname}}
  • Change to:
remote_smtp:
driver = smtp
interface = 12.14.12.14 # Change to your server IP address.
  • Save changes and exit.
  • Restart Exim
If there is an exim update when you upgrade your cPanel server you will need to re-enter the interface again.

PHP as an Apache Module?

When PHP runs as an Apache module, PHP files work under the Apache user/group known as "nobody". For example, when a PHP file needs to write to another file or create/remove a file, it does so under the name "nobody". In order to allow "nobody" to do this, you need to set specific permissions on the file/directory, such as 777 - which translates to read/write/execute by user/group/world. This is insecure because you have not only allowed the web server (Apache) to read/write to the file, you have also allowed everyone else on the server to read/write to the file as well!

Due to the above conditions, when a PHP file creates or uploads a new file to your account, the new file will be owned by the user "nobody". If you FTP into your account, all files owned by "nobody" will not be available for you to move, rename or delete. In this case, the only way to remove the "nobody" owned files would be through a file on the server or to contact support and ask for the file ownership to be changed back to your username.

How will you check and confirm that your server is using suPHP?


It's very simple to verify this. Have a simple 'php info' script.

Create a file named 'phpinfo.php' under the public_html of your domain
Insert the following code:

phpinfo();
?>

Access the file in your browser using the link http://yourdomain.com/phpinfo.php


At the top section search the line 'Server API'.

If you see CGI' then your account is hosted on a server with suPHP.

If it shows 'apache' then you are NOT on a suPHP server. 

How will I resolve the below database error?

It's very simple to verify this. Have a simple 'php info' script.

Create a file named 'phpinfo.php' under the public_html of your domain
Insert the following code:

phpinfo();
?>

Access the file in your browser using the link http://yourdomain.com/phpinfo.php


At the top section search the line 'Server API'.

If you see CGI' then your account is hosted on a server with suPHP.

If it shows 'apache' then you are NOT on a suPHP server.